
If you have decided to install rooftop solar, you are probably at the stage where you are doing what most homeowners do: calling a few solar companies and asking for quotations.
That’s a sensible approach. But there is a problem.
A quotation that says “3 kW solar system” or “5 kW rooftop solar” doesn’t tell you everything you need to know. Two companies can recommend the same system size and give you very different prices because the equipment, installation, warranties, services, and even the assumptions behind the quotation may be different. Terms like net metering, ALMM, and DISCOM inspection start showing up, and nobody explains them properly. It’s a lot to take in for a decision you’ll live with for the next 25 years.
This guide is here to cut through that. We’ll walk through what actually determines a good solar installation, what it costs, what can go wrong, and exactly what happens once you decide to move forward. By the end, you should feel confident making this decision, with us or with anyone else.
Your installer will typically need to know:
One detail worth checking early: if the electricity bill is in someone else’s name, or the property is jointly owned, recently purchased or rented, mention it at the beginning. It can affect the paperwork and application process.
Your installer should ultimately recommend the system size based on your electricity consumption, roof conditions, sanctioned load, and other applicable requirements. You don’t need to calculate the exact kW yourself before getting a quotation. But you should know roughly how much electricity your home uses.
As a quick reference:
Average monthly consumption | What it tells you |
100–200 units | Relatively low consumption; a smaller system may be appropriate |
200–300 units | A rooftop solar assessment is worth considering |
300–500 units | Solar can potentially offset a significant portion of consumption |
500+ units | A larger system may be appropriate, subject to roof and electrical constraints |
These are only starting points, not a system-sizing formula. The same kW system can produce different amounts of electricity depending on location, roof orientation, shading and other site conditions.
When an installer recommends a system, ask one simple question: “Why is this the right size for my home?” They should be able to connect the answer to your consumption and expected generation.
TIP: Don’t size your system only for today’s electricity bill. If you expect your electricity consumption to increase, for example, because you may add air-conditioning, an EV, a heat pump or other major appliances, ask your installer to show you what system size makes sense today and whether the design can accommodate future expansion. Your roof space, sanctioned load, inverter capacity and electrical infrastructure can all affect whether adding more panels later is straightforward or requires additional work.
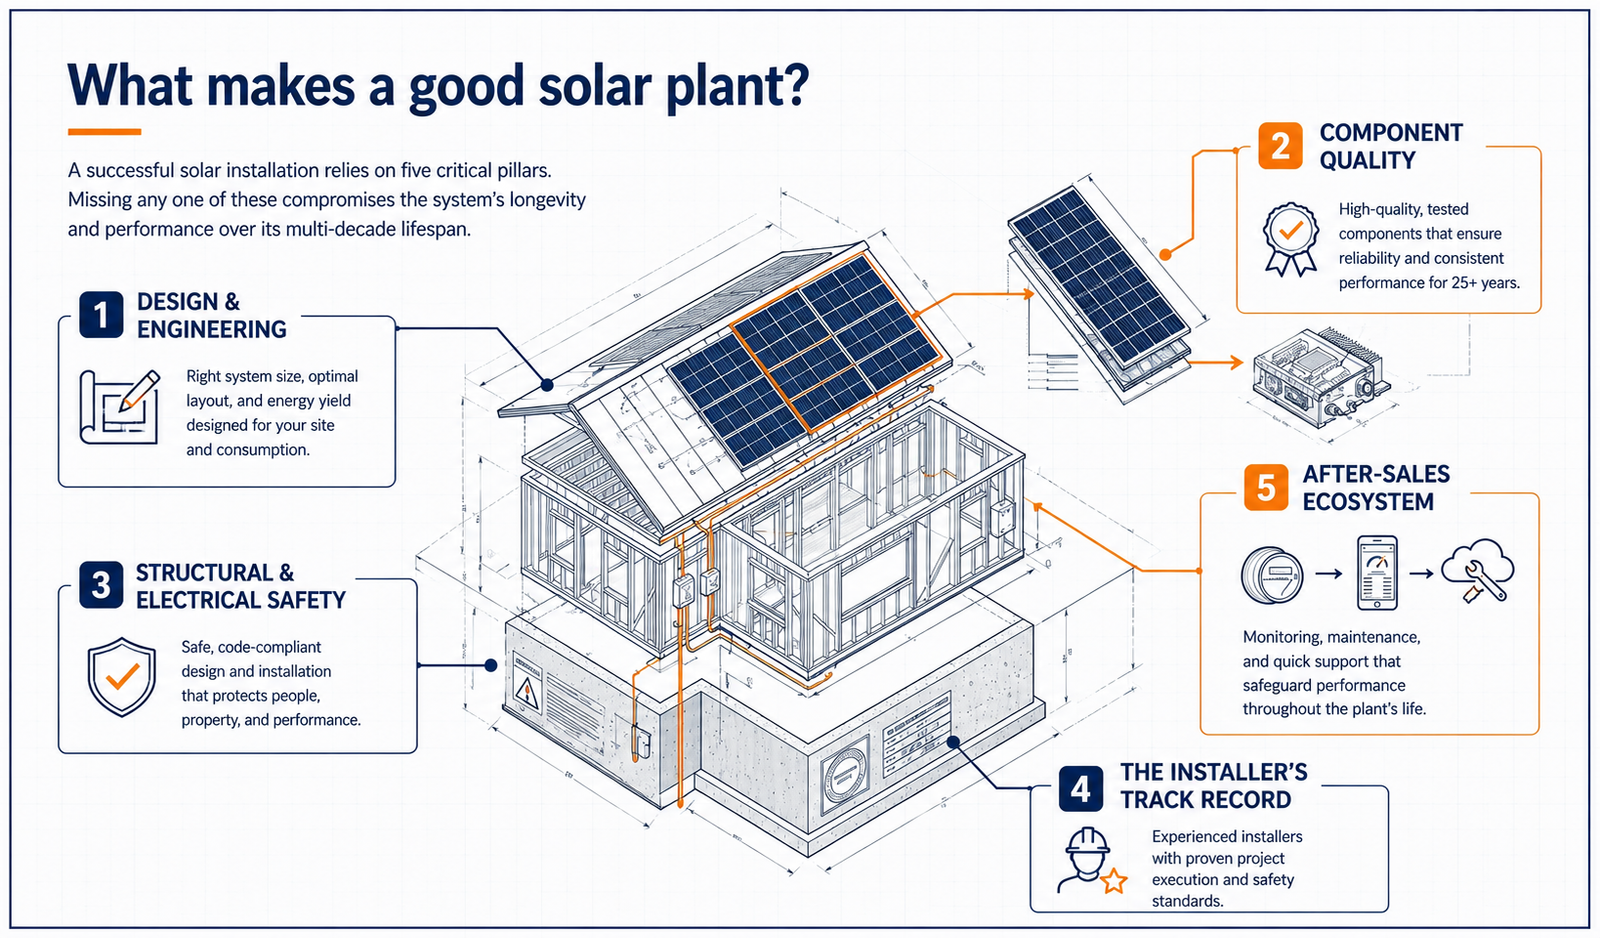
By now, you may have spoken to several installers and noticed something: quotations for similar-sized systems can often be in the same general price range. So if two quotations look similar on paper, what are you actually comparing? The difference often comes down to five things.
Solar isn’t simply about putting as many panels as possible on your roof. The system needs to be sized for your electricity consumption, and the design needs to account for factors such as:
[TIP: Check the actual array layout: True south is generally the ideal direction for solar panels, but your building may face a different direction. What matters is where the modules will actually be placed and oriented on your roof. Some installers may oversize a system when a smaller, better-oriented system could meet your needs. Ask for the array layout for true south as well as building tilt and compare the expected generation per kW between the two.
Two quotations may both say “5 kW solar system” while specifying different panels, inverters, structures or electrical components. Look beyond the brand name and check the exact make and model, applicable certifications, warranties and service support. Tier-1 panels, branded inverters with real service networks, and proper mounting structures cost more because they last longer and perform better over 25 years.
The inverter is particularly important because it is a critical part of the system and may eventually require replacement during the lifetime of the panels.
A rooftop system needs to be securely mounted and electrically protected. The installation should take into account:
(Tip: Equipment protection: Equipment should be installed under a suitable canopy or weather-protective covering, while still allowing adequate ventilation and safe access. This helps protect equipment from direct sun, rain and other weather exposure and can help maximise its service life.)
The equipment may come with a warranty, but you’re also choosing the company responsible for designing and installing the system. Look at the installer’s experience:
Experience on larger or more complex projects can also indicate that the company has established processes for design, quality checks, safety and project management.
For example: Horizon Renewable Power has executed projects at Rashtrapati Bhavan, AIIMS Jodhpur and IPGCL, and is empanelled under the PM Surya Ghar scheme across Haryana, Rajasthan, Punjab, Himachal Pradesh, Madhya Pradesh, Uttar Pradesh, Chandigarh and Delhi.
The point isn’t that a homeowner needs an installer with a long list of prestigious projects. It’s that you should look for evidence that the company knows how to execute projects properly and will be around for the long term.
A solar installation is expected to work for decades, so the relationship with your installer shouldn’t end when the panels are switched on. Before choosing a company, find out:
When you put quotations side by side, look at more than the final price.
Compare the design | Is the system properly planned for your home? |
Compare the equipment | Are the components clearly specified, with appropriate warranties and support? |
Compare the installation | Are safety, structure and electrical work properly covered? |
Compare the installer | Can they demonstrate relevant experience and the ability to support you? |
Compare the after-sales service | What happens when you need help after the installation – a year, 5 years or 10 years – down the line? |
These five things are worth keeping in mind as you read the rest of this guide. They’ll come up again when we look at what a quotation should contain, what it should cost, and how to compare competing offers.
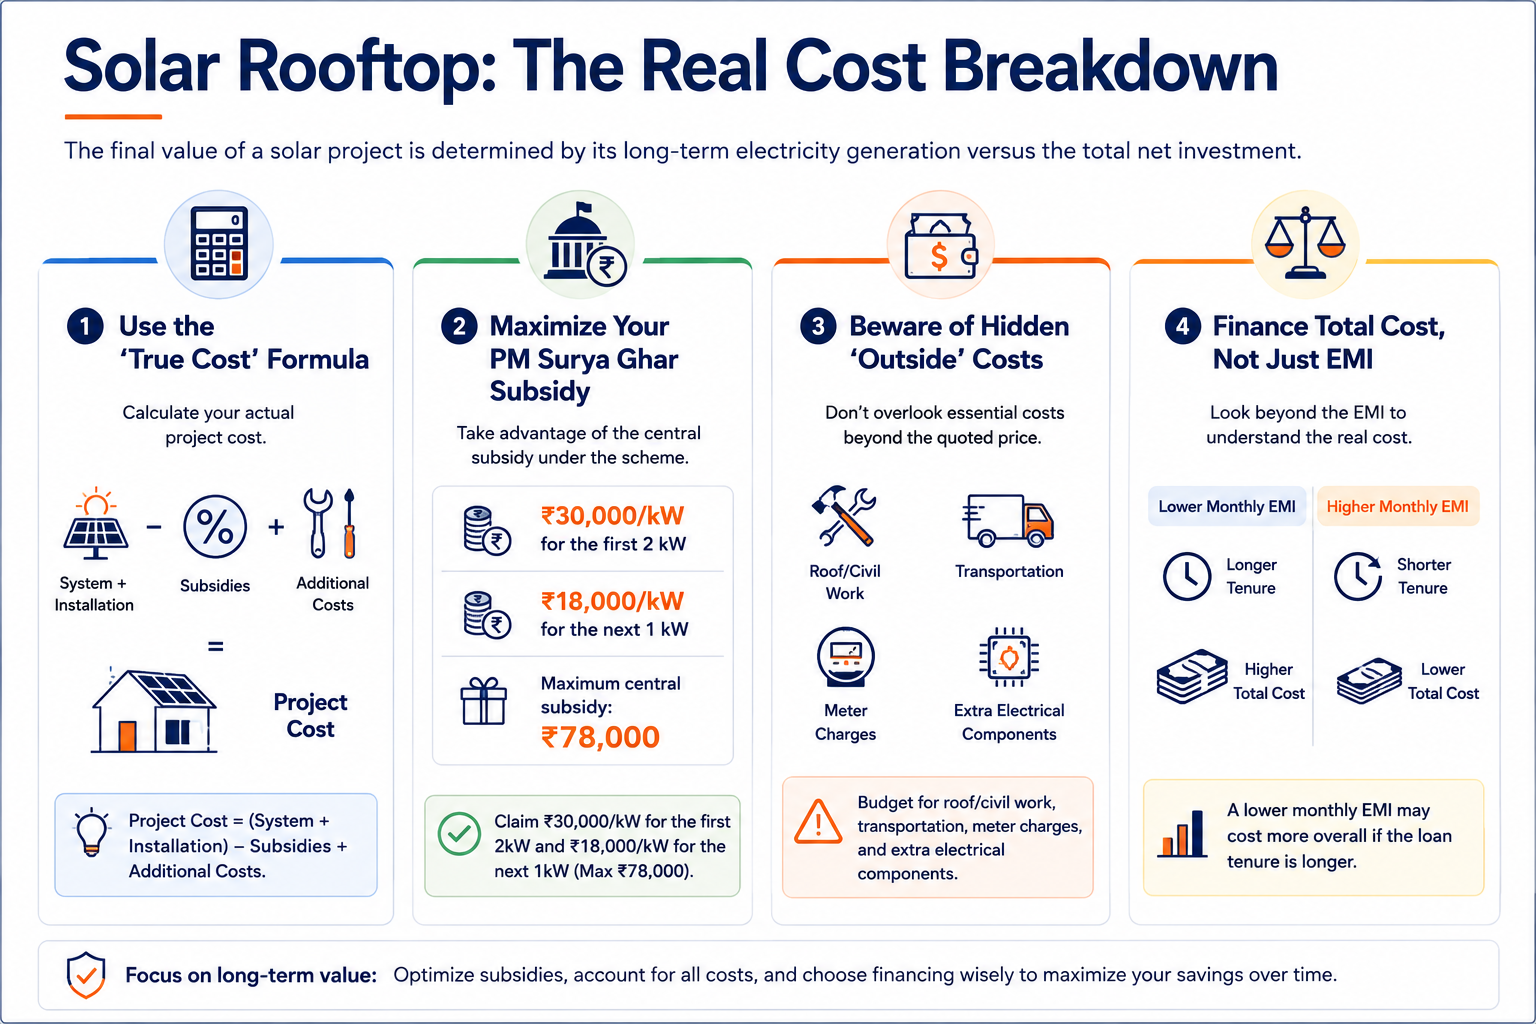
Once you have compared what’s being offered, you can start comparing the money. The number at the bottom of the quotation isn’t necessarily your final out-of-pocket cost.
Think of it as: System + installation cost − applicable subsidy + any additional costs = project cost
And if you are taking a loan: Your contribution + loan repayment and interest = your total financing outlay
Under the current PM Surya Ghar scheme, eligible residential consumers can receive central financial assistance of (state subsidy varies and depends on what is applicable in your area):
Because subsidy rules genuinely differ by state, we have put together a separate, detailed guide with exact numbers for North India: Your Complete Guide to Residential Rooftop Solar Subsidies – North India Edition. That’s the place to check your state’s exact subsidy amount and eligibility.
Your installer should be able to tell you:
A solar loan can make the upfront cost easier to manage, but compare the total cost, not just the EMI.
|
Compare |
Why it matters |
|
Loan amount |
How much you’re actually borrowing |
|
Down payment |
What you pay upfront |
|
Interest rate |
Determines borrowing cost |
|
Loan tenure |
Affects both EMI and total interest |
|
Processing/other charges |
Adds to the financing cost |
|
Total repayment |
What the loan will actually cost you |
For example, a lower monthly EMI isn’t necessarily a cheaper loan if it comes with a longer repayment period.
Before signing, ask whether the quoted price includes everything you will need to get the system operational. Check for:
Some of these may not apply to your installation. The point is to find out before you commit rather than discover an additional cost later.
The right question isn’t: “How cheap is this system?” It’s: “What am I paying, how much electricity is this system expected to generate, and what does that mean for my electricity costs over time?”
That’s the comparison that tells you whether a quotation represents good value.
A few issues come up often enough that it’s worth knowing about them in advance.
Electricity bill not in your name This is the most common cause of delay in the entire process. The subsidy is transferred to your bank account, so your name needs to match exactly across your electricity bill, Aadhaar, and bank account. Even a small difference (“Ramesh Kumar” on one document and “Ramesh Kr.” on another) can cause rejection. If your electricity connection is in a parent’s or previous owner’s name, get this corrected with your DISCOM before starting the solar process, not after.
An existing or informal solar setup If your roof already has an old or informally installed solar system, this needs to be assessed and, in most cases, formally accounted for before a new system can be added or replaced.
Shade and roof suitability Nearby buildings, water tanks, trees, or overhead structures can all reduce output. A proper site visit should always include a shadow analysis, not just a quick look at the roof.
Renting, or living in a housing society If you don’t own the property outright, or live in a group housing society, you may need a No Objection Certificate (NOC) from the owner or the society before installation can proceed.
Solar installation involves paperwork at several stages: your electricity connection, government scheme, DISCOM process, and, if applicable, your loan. The exact requirements vary by state, DISCOM and financing provider, so your installer should give you the specific list applicable to your home.
It’s useful to have these ready:
|
Document / information |
Why it may be needed |
|
Latest electricity bill |
Confirms your connection and consumer details |
|
Consumer/account details |
Required for applications |
|
Identity proof |
Applicant verification |
|
Bank account details |
Relevant to subsidy and financial processing |
|
Property/ownership documents |
May be required depending on the property and application |
|
Photographs/site information |
May be required during the application process |
|
Loan documents |
Required if you are financing the system |
Here’s exactly what to expect once you decide to move forward.
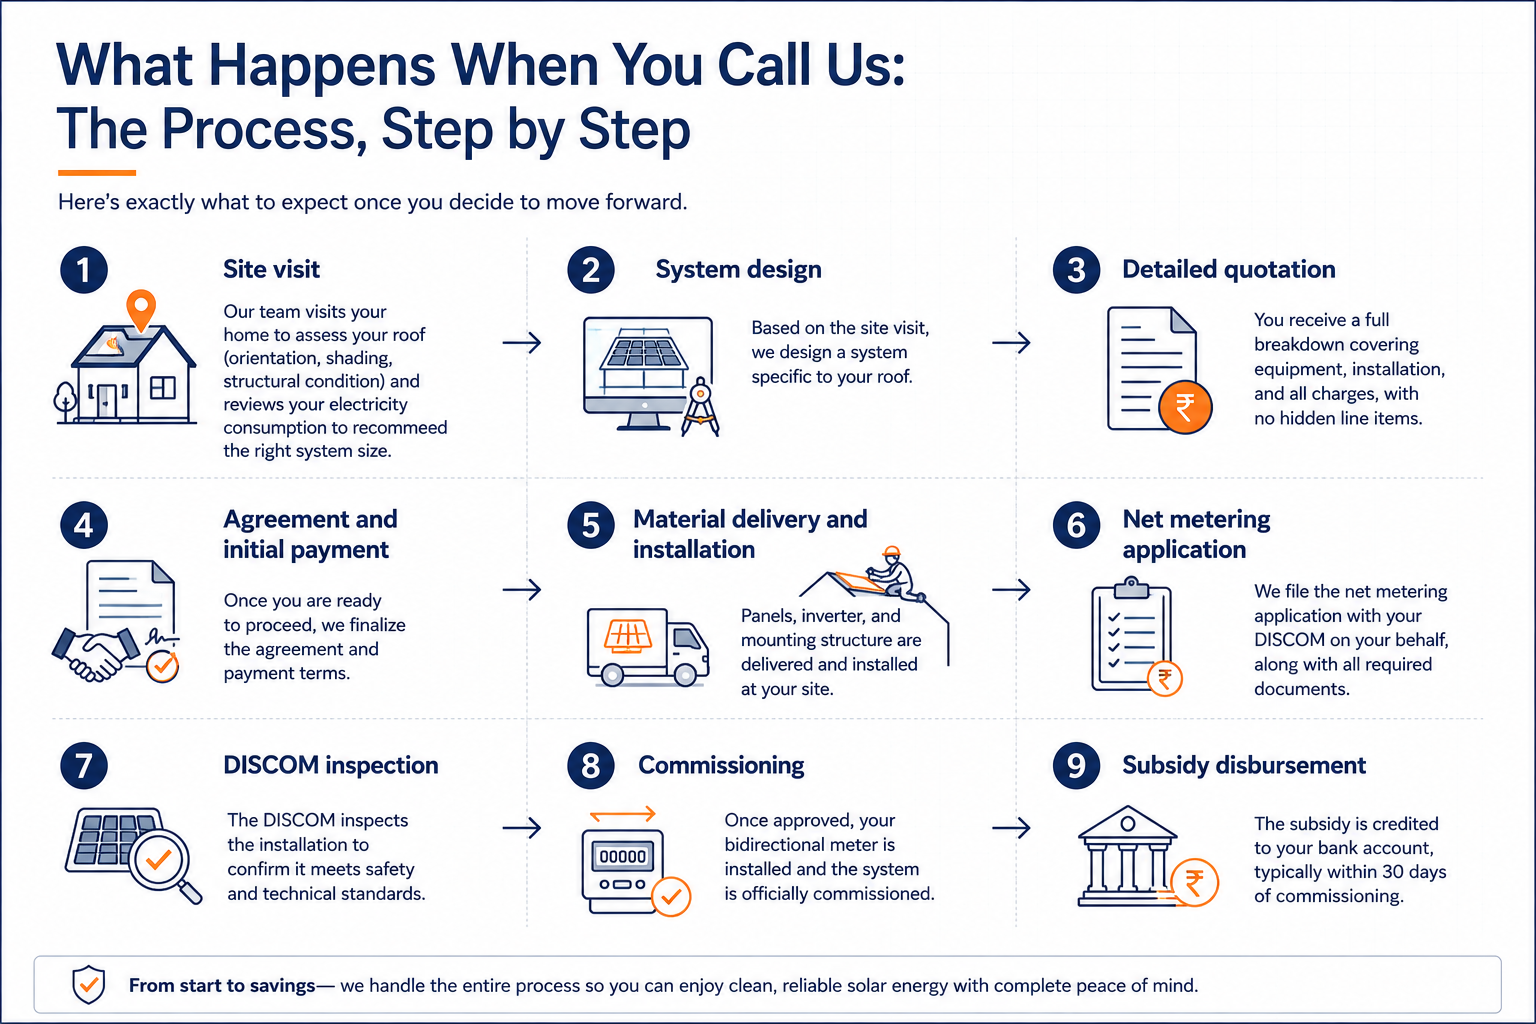
You may hear: “Installation takes seven days.” That may be true for the physical installation, but it doesn’t necessarily mean the entire solar project will be completed in two days. There is a difference between installation time and end-to-end project time.
Stage | What happens | Typical time |
Site visit to design | Roof assessment, consumption review, system design | 2-4 days |
Quotation to agreement | Reviewing the quote, finalizing terms, initial payment | Depends on you |
Material delivery | Panels, inverter, and mounting structure arrive on site | 5-10 days |
Installation | Physically mounting and wiring the system | 2-4 days |
Net metering application | Filed with your DISCOM after installation | 2-3 days |
DISCOM inspection and approval | DISCOM reviews and inspects the installation | 15-30 days |
Commissioning | Bidirectional meter installed, system goes live | A few days after approval |
Subsidy disbursement | Credited to your bank account | 30-45 days after commissioning |
Put together, most homeowners can expect 30 to 45 days from signing to commissioning under normal circumstances, with the subsidy landing separately after that.
It can take longer if:
This part of the timeline is largely outside any installer’s direct control; it depends on your DISCOM’s processing speed. A good installer’s job is to submit a complete, error-free application the first time and follow up proactively.
Myth: Solar doesn’t work well in winter or on cloudy days.
Fact: Panels still generate power on cloudy days and through winter, just at a somewhat lower output than peak summer sun. They don’t stop working; they produce less.
Myth: You need a huge roof to make solar worthwhile.
Fact: A 2-3 kW system, which covers a meaningful share of an average household’s electricity use, needs a relatively modest roof area. Most homes have enough space.
Myth: You need a battery for solar to work.
Fact: Most residential systems in India use net metering instead of batteries. Surplus power you generate during the day is exported to the grid and credited against your bill. No battery required, unless you specifically want backup power during outages.
Myth: The subsidy is an instant discount on the price.
Fact: As covered earlier, it’s a reimbursement paid after your system is installed and commissioned, not a discount applied at the time of purchase.
Myth: Any electrician can install a solar system.
Fact: Solar installation involves specific technical knowledge (system design, DISCOM documentation, net metering compliance) that a general electrician typically isn’t trained in. It also needs to be done by an MNRE-empanelled vendor for subsidy eligibility.
Myth: Maintenance is expensive and frequent.
Fact: Solar systems are largely low-maintenance. Routine care is mostly occasional cleaning and an annual check. We will cover this in detail in Part 2.
Here’s the basic math, using a typical 3 kW system as an example:
Most homeowners recover this net cost through electricity bill savings within 3 to 4.5 years. After that, the system continues generating power for another 20+ years, with electricity costs close to zero for the rest of its life (beyond minor maintenance).
One thing worth remembering: this math only holds up if the system is engineered and installed correctly. A poorly designed system can lose 15-20% of its output over time, stretching your payback period well beyond expectations.
The upfront price is only half the story. The other half is whether the system actually performs the way it’s supposed to, for the full 25 years.
“How do I know my solar system is performing properly and what do I need to do to keep it that way?”
Find out in Part 2 of the guide!